Blurring the background in photos can transform an ordinary image into something extraordinary by focusing attention on the subject and creating a professional-looking effect. Whether you’re snapping portraits, capturing objects, or experimenting with creative photography, knowing how to blur the background on your iPhone can elevate your photography game.
In this comprehensive guide, we’ll explore various ways to achieve this effect using your iPhone. From leveraging built-in features to using third-party apps, you’ll learn everything you need to know to create stunning photos with blurred backgrounds.
Why Blur Backgrounds in Photos?
Blurring the background, also known as creating a shallow depth of field, serves several purposes:
- Highlight the Subject: By softening the background, you can draw the viewer’s eye directly to the subject of the photo.
- Professional Appeal: This effect mimics the results of high-end DSLR cameras, giving your images a polished look.
- Reduce Distractions: A blurred background eliminates distracting elements, creating a cleaner and more focused composition.
Whether for personal memories or social media, mastering background blur can enhance your photographic storytelling.
Method 1: Using Portrait Mode
One of the easiest and most effective ways to blur the background on an iPhone is by using Portrait Mode. Available on most newer iPhone models, Portrait Mode uses software and dual-camera technology (or advanced AI on single-camera models) to simulate a shallow depth of field.
Steps to Use Portrait Mode:
- Open the Camera App: Launch the Camera app on your iPhone.
- Select Portrait Mode: Swipe through the modes at the bottom of the screen until you find “Portrait.”
- Frame Your Shot:
- Ensure your subject is within 2 to 8 feet of the camera for best results.
- Follow the on-screen instructions if it prompts you to adjust the distance or lighting.
- Take the Photo: Tap the shutter button. Your photo will automatically have a blurred background.
Customizing the Blur:
After taking a photo in Portrait Mode, you can adjust the level of background blur:
- Open the photo in the Photos app.
- Tap “Edit.”
- Use the “Depth Control” slider (denoted by an ƒ symbol) to increase or decrease the blur intensity.
- Save your changes.
Tips for Portrait Mode:
- Ensure good lighting for optimal results.
- Use contrasting colors between the subject and background to enhance the effect.
- Experiment with Portrait Lighting effects for added creativity.
Method 2: Using Focus and Exposure Settings
If your iPhone doesn’t have Portrait Mode, you can still create a blurred background by manipulating focus and exposure settings. This method requires some practice but can yield impressive results.
Steps:
- Open the Camera App: Launch the Camera app.
- Tap to Focus: Tap on your subject on the screen. The camera will adjust its focus and slightly blur the background.
- Adjust Exposure:
- After tapping to focus, a sun icon appears next to the focus box.
- Swipe up or down on the screen to adjust the exposure, which can enhance the depth effect.
- Capture the Shot: Once satisfied, press the shutter button.
Tips:
- Position your subject close to the camera and ensure the background is farther away.
- Use natural light to enhance the depth effect.
Method 3: Leveraging Third-Party Apps
Numerous third-party apps are designed to help you achieve professional-level background blur. These apps often include advanced features, filters, and manual adjustments for greater control.
Recommended Apps:
- Snapseed (Free)
- Open your photo in Snapseed.
- Select the “Lens Blur” tool.
- Adjust the blur strength, transition, and vignette as desired.
- Adobe Lightroom (Free, with Premium Features)
- Import your photo.
- Use the “Selective” tool to manually apply blur effects to the background.
- AfterFocus (Paid)
- This app allows you to draw around the subject and blur the remaining area.
- Offers realistic bokeh effects for a DSLR-like look.
- Focos (Free, with In-App Purchases)
- Especially powerful for dual-camera iPhones.
- Lets you adjust the aperture, simulate lens effects, and fine-tune the blur.
Method 4: Blurring Backgrounds in Video
The cinematic look isn’t limited to photos; you can also blur backgrounds in videos using Cinematic Mode, available on newer iPhone models (e.g., iPhone 13 and later).
Steps for Cinematic Mode:
- Open the Camera App.
- Select Cinematic Mode: Swipe to “Cinematic” in the Camera app.
- Frame Your Shot:
- Ensure your subject is well-lit and within an appropriate distance.
- Use on-screen focus points to lock onto your subject.
- Record: Tap the record button to start capturing with a blurred background.
Editing Cinematic Videos:
- Open your video in the Photos app.
- Tap “Edit.”
- Adjust the focus points and depth effect as needed.
Method 5: Manual Editing with Photo Editing Tools
If you’ve already taken a photo and want to blur the background, you can use editing tools to achieve the effect.
Steps Using the Photos App:
- Open the photo in the Photos app.
- Tap “Edit.”
- Use the “Adjust” tools to:
- Increase “Contrast” and “Brightness” to make the subject pop.
- Add a vignette effect to subtly blur the edges.
For more control, third-party apps like Photoshop Express or PicsArt provide advanced editing options to manually blur the background.
Tips for Better Background Blur
- Choose the Right Background:
- Busy or cluttered backgrounds may not blur as effectively.
- Use simple or natural backdrops for a more pronounced effect.
- Lighting is Key:
- Ensure proper lighting on your subject to maintain clarity.
- Avoid harsh shadows that can detract from the overall effect.
- Experiment with Angles:
- Changing the angle of your shot can alter the depth perception, enhancing the blur effect.
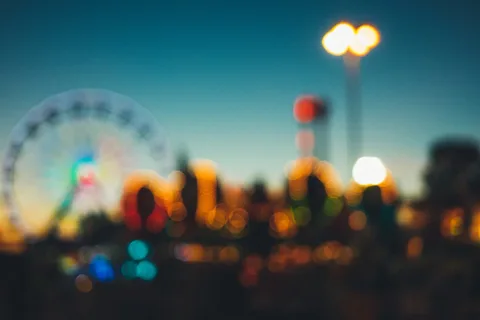
- Use Props:
- Incorporate objects like fairy lights or reflective surfaces in the background to add creative bokeh effects.
Common Mistakes to Avoid
- Getting Too Close:
- While proximity enhances blur, being too close can distort the subject or lose focus.
- Over-editing:
- Excessive blur can look unnatural. Aim for a subtle effect.
- Ignoring the Subject:
- Ensure the subject remains sharp and in focus to maintain the image’s quality.
Conclusion
Blurring the background on an iPhone is easier than ever, thanks to advancements in technology and a variety of tools at your disposal. Whether you use built-in features like Portrait Mode and Cinematic Mode or explore third-party apps for manual control, the key is to practice and experiment.
By mastering these techniques, you can elevate your photography skills and create visually stunning images that capture attention and tell compelling stories. Grab your iPhone and start blurring those backgrounds today!